Welcome to my blog!

The purpose of this blog is to explore my development of scrapbooking techniques. I will also provide reviews of products when I find something great or something terrible, and will show off all the work I enter in challenges and contests. Please check out my Welcome note if this is your first visit.

Feel free to ask questions about any of the materials or techniques shown here!

Please leave a comment and let me know what you think, or follow my blog so you can keep updated!

Happy Scrapping!


Showing posts with label 1 page sketch. Show all posts

Tuesday, May 15, 2012

Christa's Sketch #2 and Paper Secrets April Manu challenge

Christa gave us a cool and very quick sketch this month at Two Scrapbook Friends, which worked perfectly with the Authentique prize pack I won on her blog a while back!! Luckily, the Paper Secrets manu challenge was to use 75% Authentique, so I was truly in luck!


This is what I came up with:


I have to say, I have been converted to an Authentique lover. Look how gorgeous this page is, and here are my supplies:

1 ugly ass 12x12 cardstock in your most hated color you've had forever (you're covering it up anyways)
4 6x6 squares
4 photo corners from the same collection as the squares
Alphas (mini rounds) also from same collection
Random stickers
Random ribbon
and DIY thickers with pink flocking (or whatever color you need to match it up)

Literally it took me longer to pick my photos than it did to make the page!


So easy! Plus the quality of the paper is outstanding, and the colors are gorgeous! I am truly in love.

My other love - these DIY thickers. I need to order them all. I love that I can make them into whatever I want with my flocking, glitter and embossing powders. I have to get more bottled stuff like mini-beads to try those out as well!

So head out and get yourself some Authentique and some DIY thickers and have fun!!
~T

Monday, May 7, 2012

Big Picture, 2SF, Frosted Designs and Paper Secrets all wrapped up in one

Another combo project - I really like doing these to combine different things. This one uses a sketch from Two Scrapbook Friends (by Shelby)


a twine technique from the Big Picture Classes NSD event (twine button centres),

a Frosted Designs NSD BINGO card challenge [circles, buttons, stitching, flowers],


and the Paper Secrets  NSD requirement to use Authentique.


And here it is.


So my circles, if you're looking for them, are also my twine button centres. I love this technique. I am half considering going home and covering all my buttons with twine centres. But that would be crazy!!

I used that flower-like corner punch from Creative Memories for the first time on this LO and I love it. Expect to see more of that too (I can't believe I've had it for a few months and not tried it til now!)


Saturday, May 5, 2012

SYAO14, 2SF Paper Piecing and Frosted Designs NSD Challenge #1

Keepin' on keepin' on over at Paper Secrets, with this week's Scrap Your Ass Off challenge:


PRODUCTS
fabric or felt
ribbon/twine
flags & or pennants
3+ flowers
Re-cycled item such as packaging or ?
3+ patterned papers
stick pins
metal embellishment/hardware


TECHNIQUES
punches (border/corner)
acrylic paint (stamped-brushed-stencil-etc. ...your choice of application)
distressing
embossing (dry or heat)


Since this sketch was so simple, I decided to combine it with the Frosted Designs National Scrapbook Day Challenge #1 - to use only patterned papers. I also added the Paper Piecing challenge for NSD from Two Scrapbook Friends.

This is what I came up with:


I used all patterned papers except for the paper pieced tractor, so I hope that counts!!
For Paper Secrets, I used fabric, twine, 3 pp, metal, pennants, and distressing as a technique.

Supplies:
Paper: Cosmo Cricket, DCWV
Brads: Recollections
Twine: Jillibean Soup
Pennants: Punky sprouts


Wednesday, May 2, 2012

Momenta & SYAO13

I'm still working on the Scrap Your Ass Off Challenge at Paper Secrets. Its a last-woman standing competition, and I am still hanging in on week 13. Yet to figure out how I am going to stay in it while on vacation, but I'll figure it out :)

This weeks challenge:


PRODUCTS (pick 4)
fabric or felt
ribbon
photo corners/anchors
3+ flowers
chip-board
3+ patterned papers
transparency
metal embellishment/hardware


TECHNIQUES (pick 1)
punches (border/corner)
acrylic paint (stamped-brushed-stencil...your choice of application)
distressing
embossing (dry or heat)


I liked this sketch right away.... it uses more than one photo! I gotta be honest, I may die in this SYAO challenge not because I can't get the page done, but because most of them are one-photo sketches and I have about exhausted all my single photo page layouts I have for all the albums I'm working on... guess I'm going to have to start getting creative :)

What I came up with this week:


See how I snuck in that extra photo as the title? I love taking photos of the signs of places we visit. I always try to take a photo of the sign first It serves many functions:
  1. Make sure you actually remember where those photos were taken
  2. Breaks up the photos in your files easily and simply
  3. Gives you the right spelling
  4. Gives you the option of using a sign for a title! I do this quite a lot, but not always.
I also try to take photos of wordy signs when I want to remember all about something, and then I can use those as journalling. Likewise, keeping all the pamphlets is helpful in case you want to add something special to your page! I have something top secret planned for all my Hawaii pamphlets that I hope to reveal soon!!

How did I do on the challenge? Well, I used: fabric for the two flowers, ribbon, 3 flowers, a transparency (on the middle photo), 3 patterned papers and chipboard buttons. My technique was heat embossing, which I did using a Momenta stencil GS-165 to make the hibiscus flower. I also used Festive Berries and Wild Honey distress ink, and clear embossing powder.

Other supplies:
Momenta Endless Summer Paper Pack PA-1108
Momenta Vacation Pyramid Pack PA-2389
Creative Memories transparent sticker and journalling card
Precocious Paper flowers and ribbon

Tuesday, May 1, 2012

Paper Secrets April Sketch and the 2SF Easter Menu Challenge

Two Scrapbook Friends issued an Easter Brunch challenge. We had to select our menu first, and then we found out what the corresponding items or techniques were that we had to use.

This is my menu and techniques:
Eggs Benedict: USE A TAG
Peach Cream Pie: CREATE A FLOWER
agus with Hollandaise Sauce: USE FABRIC (NOT RIBBON)
Crepes with fruit: USE ATLEAST TWO BUTTONS
Broccoli and Ham Quiche: USE ATLEAST 3 DIFFERENT Manufacturers
Fresh Fruit Salad: USE SOMETHING YELLOW

I decided to pair it with the April sketch from Paper Secrets:


So without further discussion...


I used a combo of the Authentique Gathering papers and my old stand by Cosmo Cricket Ever After. My third manufacturer was We R MK or Ranger or Twinery or misc... whoever you want it to be really :)

The tag and all the alpha/word stickers are from Authentique as well. The chipboard flower from Cosmo cricket, and the leaves from Precocious Paper. I made both flowers by hand out of fabric, the top one being an organza "lollipop" style flower, and the other a twisted tulle and chiffon (I think) flower.

There are two buttons, one on the flower and one beside the other flower. Finally that Cosmo Cricket flower is very light yellow, *phew*. That was a lot of stuff to get in on one layout, but I love it!!

Sunday, April 29, 2012

Sketches with a Twist April

I'm really enjoying the monthly fun at Sketches with a Twist. April's sketch is below, and the twist was to use some mesh (any old mesh hanging around the house).


I have to admit, first I tried misting through the mest, but hated the color combo with the photos I wanted to use, so I ripped that apart and opted to use the mesh itself. It is from an onion bag, in case you don't recognize it.


I inked my chipboard letters to give them the brown color with Walnut Stain distress ink, and the orange alphas are DIY thickers with embossing powder. If you are going to emboss DIY thickers, be ready for the fact that they shrink a bit. I think I lost about 1/4 of the size, and they started to curl as well, so you just have to be light and easy with the heat gun on them.

I used Tattered Angels and acrylic paint on the butterfly, and added some twine. I also added the third photo to this sketch in an oval. The papers are from MME paisley stack.

Two Scrapbook Friends National Scrapbook Day Online Crop - Jayne's challenge

Two Scrapbook Friends is hosting an online crop for National Scrapbook Day which started last Friday. Jayne's challenge was to use REAL stitching (none of that sew stamper stuff), either machine or hand, on a layout.

I decided to couple it with a sketch from Scrapping Everyday Miracles, where you also had to use distressing or sanding.


I also decided to add the Scraptastic challenge number 3, to use your stash and stitch.

This is what I made:


Are you amazed I followed the sketch so closely? I sure am!!

I definitely stitched, using some old embroidery floss from making friendship bracelets. I also have the metal letters below from my stash... it took me a while to figure out a title I could make with the letters I have left (can't believe I had two s left!). Finally the green and yellow cardstock are stash items. I know, you're asking... where is the yellow cardstock? Well, its the scalloped border and I covered it with Walnut stain distress ink, Tattered Angels leather glimmermist and some green glimmer glam. I also distressed the green cardstock, the photos and the journalling card (Bo Bunny).


Isn't it all cute? In case you're wondering, the background paper is Momenta PA-1108 Endless summer paper pack.

Thursday, April 19, 2012

SYAO 10 and SYAO 11 - two very different examples of my talent lol

I'm still in it to win it over at Paper Secrets, and here is what I created for weeks 10 and 11.
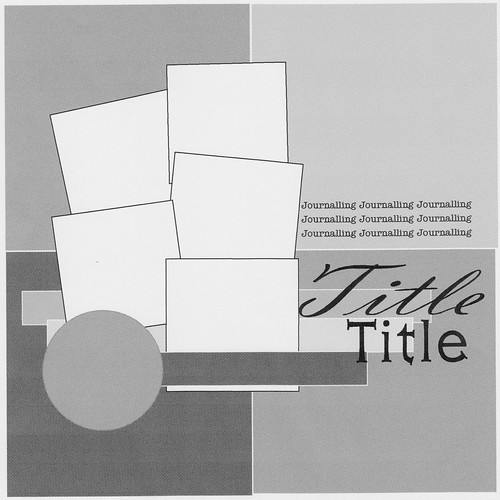
SYAO10


doily
twine
stick pin(s)
3+ flowers
chip-board
washi tape
3+ patterned papers
bling

TECHNIQUES
punches (border/corner)
acyrlic paint (stamped-brushed-stencil...your choice of application)
distressing

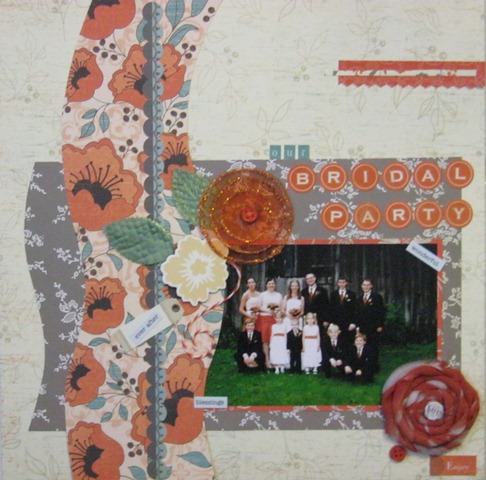
I've actually already used this sketch once, which threw me off a bit...  But I recovered at the last minute and got back in the game. I knew I didn't want both pages to look like they were from the same sketch, so I planned to make some modifications, maybe turn it, and then this happened (lol!)


See it? My itty bitty bit of bling on the metal tag :)


I swear this bow looked better IRL... grr

I know. Its totally the same sketch. But it will be far enough apart in the album that no one will notice (I hope!)
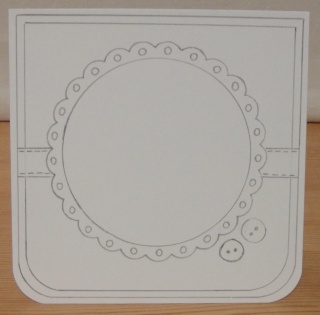

All the papers are Momenta from the Seasons and Occasions pack (PA-1992), the black and white cardstock pack (PA-2390), and a photo mat pack. Stick pins are made by me for the one in the middle, and Maya Road for the green leafies. The metal tag is Making Memories and the chipboard is Cosmo Cricket. The circle tags are Colorbok. I used a Tim Holtz mask and Jenni Bowlin Weathered Wood paint dauber to do the edges and the clock.

So how did I do on the challenge? I used twine, stick pins, chipboard, and bling, and used acrytic paint as my technique.
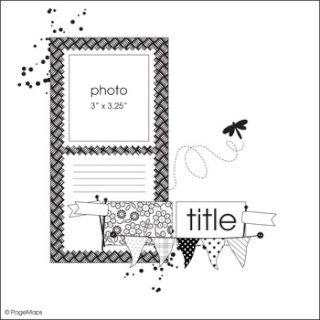
SYAO11


PRODUCTS
2 or more tags
twine
stick pin(s)
3+ flowers
chip-board
washi tape
3+ patterned papers
metal/foil type embellie(s)


TECHNIQUES
punches (border/corner)
acyrlic paint (stamped-brushed-stencil...your choice of application)
distressing
embossing (dry or heat)
What a crazy sketch! I mean, really... what was I gonna do with that! Surprisingly it turned out FABULOUS...


I love using hand writing!!

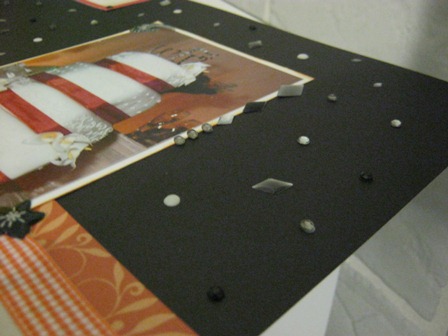
Love my new embossing folders matched with Distress ink.. how cool do those two pieces look?
Aren't you surprised? I know, the sketch is barely recognizable (which is sort of how I wanted it) and I cheated all over the place (of course).. and as I'm typing this I just realized that waves sticker at the bottom right of the photo moved itself and is upsidedown!! How did that happen?? Grr... Stupid non-sticky stickers. Anyways it should be right side up and nice and linearly placed like the sun sticker on the opposite corner!

My supplies? Well... this is a Momenta layout for sure: the solids in green and orange that were embossed are from PA-1033 the vibrant cardstock pack. The two blue strips plus the yellowy orangey background page are from the Travel pyramid pack PA-2389,  and finally the circly paper is from the Endless Summer collection PA-1108.  Also Momenta is the "Welcome to Paradise" sticker and the stripey tag from ST-4952 the vacation multi pack of stickers.

Then I added twine from the Twinery, random stickers and die cuts, a ship's wheel from the bead section, some ric rak (I love that stuff) and distress inks in Evergreen, Peeled Paint and Spiced Marmalade. The embossing folders are both Tim Holtz (in case y'all didn't already know!) Oh and also an eyelet from a random bag of eyelets I found in my scrap room, and the big orange eyelet type thing from We R MK.

So I used: 2 tags, twine, patterned papers, metals and embossing.

Hope you enjoy and are inspired to EMBOSS!

Wednesday, April 18, 2012

Momenta and 2SF March Sketches by Joann and Sharlene

This is Sharlene's sketch. Its a card sketch but I used it for a layout instead.

This is what I came up with:


The circle is from Bo Bunny, frogs from Sticko and pretty much the rest of the paper and the alphas are Momenta. The patterned papers are Chloe's Garden from PA-2384, and the alphas are from ST-3194.


This is Joanne's sketch:

And here is what I created:


This one is a big mish-mash including Momenta, Recollections, Bazzill. The bling and puffy stickers are all Momenta from three different packages: ST-3087, ST-3052, ST-3503.

Saturday, March 24, 2012

2SF - Jayne's 2nd Sketch - Me & PT

Jayne over at Two Scrapbook Friends has come up with another fabulous sketch:


And this is what I did with it!


All the papers are MME from a Paisley stack, other than the solids I used. The rest of the stuff is all randoms. I did this at the 2SF crop on the weekend, which is where I found the fab punches to use.

That's mini me and my fave teddy I got when I was 3 or 4... in my bed with my fave sheets! Those sheets were the best too! 

Friday, March 23, 2012

Paper Secrets March Sketch Challenge

Paper Secrets also has monthly challenges. Every month, one of these challenges is a sketch challenge.


I deviated from this sketch a fair bit, but maintained the photo area and moved it towards the side of the page.


I used some Fancy Pants paper, MME paisley paper, and DCWV textured paper, a bunch of flowers and brads, and a Making Memories sticker. Letters are Thickers and the small ones from Authentique.

The photo is the first time I stood up - Mom turned around and there I was! 


Sketches with a Twist - My Soldier

Sketches with a Twist brings fabulous monthly sketches and a little twist to the sketch. This month's sketch is below, and the twist was to use 3 identical embellishments (hard!)


The chevrons (which I love, but they take so long to make!) inspired me to use photos of my friend, a soldier in the Canadian Armed Forces, for this page. His face and his guest's are blacked out to protect their identities...

He'd just gotten back from Afganistan in I believe April before my wedding. His division had been hit by roadside bombs twice between Christmas and New Years that year, and two of his colleagues were killed, and he was hospitalized but OK. This was the first time I saw him since he had gotten back and was all tears to see him home safe and in one piece. 


The chevrons are all hand made. I truly don't think they look that uneven in real life!! I hope not or I have some ripping to get going on! I originally planned to use the three Bo Bunny Cambridge brads down the centre between the photos as my 3 identical... but then I realized, they aren't identical!


I made these mini ribbons like you would find on his jacket out of ribbon and bar staples. The ribbons are Fancy Pants (left) and Cosmo Cricket (right)


My three identical elements  are the itsy bitsy star brads holding the twine down the centre of my chevrons. There are actually 10 stars total included :)

Hope you enjoy... and no matter the cause, support our troops. Our brave men and women need all the love, admiration and support that they can get... and that's what they deserve!

xxx

Tuesday, March 20, 2012

SYAO7

Having lots of fun as part of the Scrap Your Ass Off competition at Paper Secrets.

This week's challenge, and as a reminder I have to use 4 of the 8 elements and 1 of the 3 techniques:


Lace/Trim/Ribbon
3+buttons
3+flowers
rubons
chipboard
bling
staples
3+ patterned papers

TECHNIQUES
stitching (hand-machine or faux)
misting
distressing


I love this sketch and had lots of fun using it.


I used a ton of chipboard on this one, rick rack trim, flowers (chipboard and gem ones) and more than 3 patterned papers. My technique was distressing using Black Soot inks on the chipboard letters and the vellum, frame, and black papers.


Frosted Designs, Challenge Me Happy & 2SF sketch Challenge Combo

So I was over at Two Scrapbook Friends on the weekend for a crop, and DT member Jayne was working away on the LO she is using for her sketch challenge to be posted today. She mentioned that in passing, so I borrowed her LO, sketched it up, and went to work (I really love that LO!)

 
I will update this post with the sketch when I get it tomorrow off the forum.

 
In addition, I am also using this LO for two more challenges:
  • Frosted Designs - use wings - the wings chipboard is from Bo Bunny Cambridge (2010)
  • Challenge Me Happy - Make your own embellishments - I made two folded paper flowers that Jayne also had on hers, as I loved them and wanted to try them out!

 
This is the final project:


If there was a challenge for using as many manu's as possible, I would get it too! I used DCWV Photo Stack 2 for the background, Creative Memories Reminisce for the light orange flower and the scalloped strip thing, Cosmo Cricket EverAfter for the three circles other than the dark one. The dark one is Colorbok, the chipboard and two round brads are Bo Bunny Cambridge, the charm is My Mind's Eye, and the buttons and jute I will call 2SF brand since I got them loose in the store! Phew! Longest supply list ever!
 
Oh... and I used my Staedtler pens to write the title on the wings... those are the pens I always use and never remember to tell you all!


Both flowers are made the same way. Cut 5 circles, and fold 3 of them into quarters. Glue onto the 5th circle. For the bottom flower, I then folded the top layer of each folded circle back into an eighth size to give the added flair. I think you can go further by changing how you fold the 1/8 portion and placing them next to each other or alternating like I did. You do need a glue gun to get the button to stick though!