Welcome to my blog!

The purpose of this blog is to explore my development of scrapbooking techniques. I will also provide reviews of products when I find something great or something terrible, and will show off all the work I enter in challenges and contests. Please check out my Welcome note if this is your first visit.

Feel free to ask questions about any of the materials or techniques shown here!

Please leave a comment and let me know what you think, or follow my blog so you can keep updated!

Happy Scrapping!


Friday, November 18, 2011

Another cool Giveaway - Once Upon A ... Sketch

WOW. This giveaway is gorgeous... so don't all of you go entering because I want it!


LOL no go right on ahead!

The giveaway is from Scrap That! - a Canadian kit club (I gotta check this one out!)

Visit Once Upon A ...Sketch for all the details.

It is a pretty snazzy blog giving out sketch challenges with a twist - there is a journalling requirement too! It makes it hard to play along all the time for me as often its not something I feel comfortable journalling about (aka journalling about me) but I'm trying to get there!

Thursday, November 17, 2011

2SF Online Crop - Shelby's Challenge - Green with Envy

Shelby provided the Green with Envy challenge for the 2SF Burst of Color online crop over at their forum.

Right away I groaned. Green is sooo not my color. I have some specific colors of green that I like, and I have 2 green sweaters, but thats about it for me and green.

So I whined.

Then I forced myself to just get it over with as then I could have fun doing the other colored challenges I liked so much better.


So there was no sun yesterday here, so the photo above is a little screwed up. The colors are actually what you see in the photo below - not sure why that one worked out so much better!

I picked the patterned paper because I wanted a pattern (Shelby used one in her preview) and it was the nicest green paper I had. Then I riffled through my photos looking for something that worked with the green - when I came upon Dylan in this orange shirt.

Add a Creative Memories journalling card, two CM photo mats and TA-DA the base layout was complete.

I was originally going to use my blue letters for the whole title, but I didn't have one of the letters for FACE and had already stuck them on. In retrospect, I love the two types of stickers much better anyways because it adds more emphasis to the key word in the title. The "Face" stickers are Rugged from CM.

The "True Story" sticker is also CM. This was really just a CM layout, other than a few letters and the base patterned paper and the Cricut flowers.


All in all a simple layout, but that is what I was going for with this one to emphasize the story.


Hope you enjoy, please comment, and follow!

Thanks

Use it Tuesday #19 - Cooking Up Fun

So I found a new challenge blog this week that I love so much I applied to their Design Team!

Use it Tuesday is a blog with varied challenge types, and the whole goal is to use up your old stuff in your stash... so right up my alley as I am still banned from Michael's until after Christmas (did get a hall pass to go buy some more adhesive as I ran out last night).

So finding it yesterday and the challenge is due tomorrow, I was in a bit of a rush.

Here is Challenge #19:
COOKING!

One of my favourite topics, and a refreshing break from the two color palette challenges I did last night too! Plus, Two Scrapbook Friends is having a Burst of Color online crop right now, so I've got color challenges coming out the.... hoo hah? I have no idea how to spell that word!

Anyways... back to the challenge:

I decided since I had to use old stuff I would actually finish a layout I prepped about 2 years ago and that has been sitting in my album waiting for me to put it together. All I had made was the base for the door and the papers amassed. This is what it came out to be:


My friend Laura made my wedding cake for me. It was sooo yummy - we used a Martha Stewart lemon recipe, and was slightly oversized (I have 2 pieces still in my freezer), but it was gorgeous.


I made a little door to hide the final product. Originally this door was supposed to open vertically back 2 years ago, but I changed which photos I wanted to use and changed the door. 

Here is a closeup of the title on the door and the stamping.

Here is the closure on the door, the twine actually hooks to hold it shut.


So what did I use out of my stash:
  1. old unused papers that were sitting in my album for 2 years (who knows when I bought them to begin with, I think another 1-2 years earlier)
  2. photos I printed 2 years ago
  3. a paper and cardstock door I made two years ago
  4. All three stamps (bell, cake and arrows) which I bought before the wedding (June 2009) and have not used those specific stamps off the cards yet
  5. The letters for CAKE - this is some old pack of stickers I don't know when I bought it, but it was a long time ago because there is lots missing out of the pack and I'm at the point where I wish I had bought two  (TIP: always buy two packs of alphas. You'll need them. Guaranteed)
What was new:
  1. The twine! I just got my twine in last month and I am using it up quick!
  2. The "Making the" letters - also bought them last month although I bought them from my Creative Memories Consultant's stash of stuff.... so sort of old
And the brad I used I will classify as neither old nor new. I've had them for about a year so I don't think they fall in either class.

Back to always buy two sets of alphas... look at the "e" in "the". Can you tell its a "c" I made into an "e" with a marker? That's why you need two sets. Because sometimes you need extra letters. And to be honest, its not always the obvious ones. I.e. L. My friend Kelly used both my Ls. So the layout I did that day using the same chipboard letters was missing an L til I picked up another pack. Haven't used an L since and I have done at least 3-4 more layouts with those alphas lol

Another TIP - when you buy alphas, look at if you get extra vowels, "s", "t", "r". At the very very least you want an extra of each of those letters otherwise you're stuck with a page of W and X at the end. (at least you can make a W into a M)

And a final TIP - look for punctuation and other add-ons to your alpha set. Jillibean Soup has great alphas that include some shapes, punctuation etc. I also really love my Nancy O'Dell Hummingbird letters from Creative Memories as they came with little doodled flowers to match those on some of the capital letters.... I just wish they came with more as I have capitals left over and no more flowers :(


Well... that was a bit of a long one! Thanks for reading and please comment and follow.

Also, I have now labelled all my posts so you can find similar ones. Use the TIPS label to find all my tips to you my wonderful readers!

Thanks


CR84FN2 - Nails

I am really loving doing color challenges. They make me think so hard about where it would work, and most of the time my original thought doesn't work out.

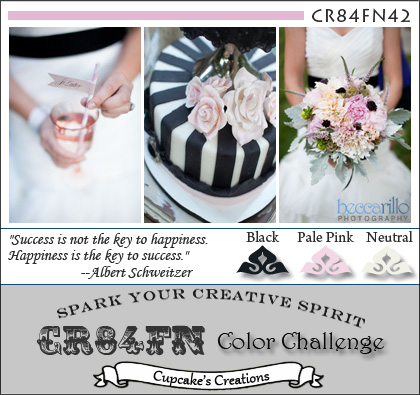
This week CR84FN brought us challenge 2 (actually the 3rd, it was numbered 0), which is shown below. You have to use the named colors as your main colors (aka you can add any other color in small amounts) and of course neutrals don't count (although for this one you have been given two neutrals).


This palette screams girly girl, babies, a trendy wedding scheme. Since my wedding was orange and green - there was no way pink was making it to another wedding page... at least not as the top color.

So I was thinking - why not our spa day? The actual photos from the day are terrible as they were taken on my old cell phone, but I wanted to document the day nonetheless.

Somehow there are no photos of my two bridesmaids? I wrote their names on the page to acknowledge they were there.

So here is my pale pink, neutral (cream) and black layout:


Under the title I added a tiny bit of journalling. I also made this cute stacked flower using two Cricut cut flowers, a Recollections punched flower, and a clear bling to draw in the clear bling on the black flowers (Jolee's). The border around the striped circle is also from my Recollections punch - I went a bit punch crazy for another LO and used all those and still have a stack of them on my desk!

Thanks for looking and please comment and follow my blog! Hope to see you back here soon!

The Color Room #84 - The Cog

The Color Room brings us fun palettes every week to base a project on. This week's is shown below. It is a whitewash palette, meaning you can add no neutrals to the palette - what you see is all you get.
 

They also provide a totally optional sketch to include with your palette:


I thought with the woody colors it would be perfect to set off more of the photos from the cog (see my entry for the Paper Variety Smile challenge to get the full story).


I couldn't find the exact colors I wanted so improvised with three browns to match (the third being the Walnut Stain ink).


Everything came from the stash - nothing special or new here. I did use my new Martha Stewart letter stamps for the title with the Walnut Stain distress ink.

Here's a hint: if you are having a hard time getting your Distress inks to stamp easily, there are a few things you need to do:
  1. Store your inks upside down. All your inks should be stored this way, but it is especially important for the distress inks to keep that pad moist for when you need it
  2. Spend a good amount of time charging your stamp with ink. I press and hold then wiggle rather than dabbing and I have pretty good results. Generally I count 10 wiggles (side to side, top to bottom) to fully charge the image

Thanks for looking and I hope that tip helps you all out!

Wednesday, November 16, 2011

Scrapping Everyday Miracles - Inspiration Week


Hey all... just wanted to let you know what's coming up over at Scrapping Everyday Miracles... an inspiration week!

The DT will be sharing projects to get you motivated for the holiday season, plus there will be discount codes for some Etsy stores, Manufacturers, and scrapbooking stores!

Please drop by and check it out!

Moxie Fab World - 365 Cards Week - Random Fun Challenge - Button

I am loving the 365 Cards week over at Moxie Fab World and all the fun challenges they are providing us.

The Random Fun challenge was this:
Create a paper crafted card that incorporates a button(s), a mustache(s), or an alcoholic beverage.

Right away I thought of the phrase "Cute as a Button".... and since I have a friend who will be having a little girl in March, I made this girly baby card for her....


I really love this fuzzy button I have. I got it in a 1 lb grab bag of buttons. I used embroidery floss for the tie on the button.

The patterned paper is DCWV The Glitter Stack, and I titled with my Copics (T10).

Thanks for looking, please leave a comment and follow my blog!