Welcome to my blog!

The purpose of this blog is to explore my development of scrapbooking techniques. I will also provide reviews of products when I find something great or something terrible, and will show off all the work I enter in challenges and contests. Please check out my Welcome note if this is your first visit.

Feel free to ask questions about any of the materials or techniques shown here!

Please leave a comment and let me know what you think, or follow my blog so you can keep updated!

Happy Scrapping!


Showing posts with label Distress Inks. Show all posts

Monday, May 7, 2012

NSD: Big Picture and Frosted Designs combine :)

I combined the Big Picture Classes challenge to use a pocket with the Frosted Designs use nothing new Facebook challenge, both for NSD.


I used NOTHING new on this one except for some adhesive. I bought the paper in Hawaii, I've had the pocket since forever, and all the "embellies" are cut out of brochures from Hawaii. I did use some new sparkle embossing powder I bought last week... but I already had it for this challenge so I don't think that counts!

The pocket holds the airline tickets which are a bit ugly. I misted it in blue and red (which all came out brownish), sparkle embossed over Festive berries distress ink, and splashed some orange Dylusions mist to make the splotches.

This page will serve as a mini title page for the Big Island part of our trip.

Thursday, April 19, 2012

SYAO 10 and SYAO 11 - two very different examples of my talent lol

I'm still in it to win it over at Paper Secrets, and here is what I created for weeks 10 and 11.

SYAO10


doily
twine
stick pin(s)
3+ flowers
chip-board
washi tape
3+ patterned papers
bling

TECHNIQUES
punches (border/corner)
acyrlic paint (stamped-brushed-stencil...your choice of application)
distressing

I've actually already used this sketch once, which threw me off a bit...  But I recovered at the last minute and got back in the game. I knew I didn't want both pages to look like they were from the same sketch, so I planned to make some modifications, maybe turn it, and then this happened (lol!)


See it? My itty bitty bit of bling on the metal tag :)


I swear this bow looked better IRL... grr

I know. Its totally the same sketch. But it will be far enough apart in the album that no one will notice (I hope!)


All the papers are Momenta from the Seasons and Occasions pack (PA-1992), the black and white cardstock pack (PA-2390), and a photo mat pack. Stick pins are made by me for the one in the middle, and Maya Road for the green leafies. The metal tag is Making Memories and the chipboard is Cosmo Cricket. The circle tags are Colorbok. I used a Tim Holtz mask and Jenni Bowlin Weathered Wood paint dauber to do the edges and the clock.

So how did I do on the challenge? I used twine, stick pins, chipboard, and bling, and used acrytic paint as my technique.

SYAO11


PRODUCTS
2 or more tags
twine
stick pin(s)
3+ flowers
chip-board
washi tape
3+ patterned papers
metal/foil type embellie(s)


TECHNIQUES
punches (border/corner)
acyrlic paint (stamped-brushed-stencil...your choice of application)
distressing
embossing (dry or heat)
What a crazy sketch! I mean, really... what was I gonna do with that! Surprisingly it turned out FABULOUS...


I love using hand writing!!

Love my new embossing folders matched with Distress ink.. how cool do those two pieces look?
Aren't you surprised? I know, the sketch is barely recognizable (which is sort of how I wanted it) and I cheated all over the place (of course).. and as I'm typing this I just realized that waves sticker at the bottom right of the photo moved itself and is upsidedown!! How did that happen?? Grr... Stupid non-sticky stickers. Anyways it should be right side up and nice and linearly placed like the sun sticker on the opposite corner!

My supplies? Well... this is a Momenta layout for sure: the solids in green and orange that were embossed are from PA-1033 the vibrant cardstock pack. The two blue strips plus the yellowy orangey background page are from the Travel pyramid pack PA-2389,  and finally the circly paper is from the Endless Summer collection PA-1108.  Also Momenta is the "Welcome to Paradise" sticker and the stripey tag from ST-4952 the vacation multi pack of stickers.

Then I added twine from the Twinery, random stickers and die cuts, a ship's wheel from the bead section, some ric rak (I love that stuff) and distress inks in Evergreen, Peeled Paint and Spiced Marmalade. The embossing folders are both Tim Holtz (in case y'all didn't already know!) Oh and also an eyelet from a random bag of eyelets I found in my scrap room, and the big orange eyelet type thing from We R MK.

So I used: 2 tags, twine, patterned papers, metals and embossing.

Hope you enjoy and are inspired to EMBOSS!

Monday, April 16, 2012

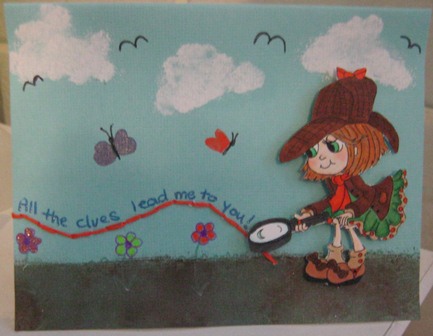
CYAO10 - Lil Shirley Holmes

This week I had fun with CYAO10 at Paper Secrets.


Use 3 of the following products/techniques:
use twine
clouds
markers
spring colors
mist
card stock on the front of your card 


I didn't want to use a tree and clothesline, so I decided to use this cute Shirley Holmes image from Scrapbook Stamp Society and a twine-based "trail" for her to follow.


From the list, I used, clouds, markers, twine, mist (in the dirt as texture) and cardstock on the front of the card. I might even have used spring colors, making it my first 6/6 card!


The other challenges I am also entering this one in are:
Corrosive Challenge #147 - hit the bottle (use something from a bottle - glimmermist and distress stain)
Pile it On Challenge #16 - Pop it up - Shirley Holmes is popped up :)
Alphabet Challenge blog - E is for Embroidery (or stitching!)
Fairy Fun Fridays - Anything goes
Joyful Stamper - Anything goes
Delightful Challenges - stitching
Creative Belli Blog Challenge #141 - children

Zobbie Zombie is back!

I love the Zobbie Zombie image from Scrapbook Stamp Society. I find myself coloring him over and over, and so I decided to use him to make a birthday card for my 17 year old brother in law to whom zombies are, of course, cool...

This time I skipped the bling and Stickles to keep him a little more masculine :)


I used:
DCWV card base
Momenta paper (from my ancient pack yet again!)
Both the base and the paper were misted with Tattered Angels leather glimmermist (OK so I added a bit of girly)
some black corrugate
Sentiment is printed out
Spiced Marmalade distress ink


I am entering this card in the following challenges:
One Stitch at a Time Challenge #109 - brights - I think this card is rather bright!
Pan Pastel Challenge #14 - one for the boys
Paper Sundaes Challenge #116 - Anything goes
Stampalot April Challenge - Happy Birthday
Ink on my Fingers - Men themed (he's 17 so he counts now eh?)

Sunday, March 25, 2012

TUTORIAL: Customizing Momenta Cardstock and a Scrapbook Stamp Society Image

This week, I got this new release, Super Hero Zell & her Walker by Sherri Baldy from Scrapbook Stamp Society to play with.

I wanted to use my textured black Momenta cardstock but I wanted some way to bring out the texture more, and of course you can't just ink up the black cardstock straight.

I thought I would share with you how I did this.

What you need:
Cardstock cut to size (I used Momenta - any textured Momenta will work)
Sanding block of some sort
Ink

Here is my pre-cut cardstock card out of Momenta PA-2390 

A piece of 2x4 and some scrap sand paper is all I use!


Sand the paper. I used a wood block and a piece of sand paper, but you could a drywall sanding sponge or a commercially available paper sanding tool. I find with a linear pattern like this, you can highlight the pattern best by sanding along the lines.  Sand more heavily on the edges to really highlight the texture and the edges

Wipe/blow off as much of the sandings as you can from the paper. You don't want these to accumulate on your ink pad.

Rub down the surface and edges with the ink pad. I used Peeled Paint distress ink.


I also made my own multicolor twine, or at least thats what it looks like. I used two pieces of embroidery floss, and twisted them together between my fingers as I wrapped, using Scotch tape on the back to anchor it. Excuse the inky fingers... I am a pro at getting dirty :)

I colored the image with my Copic markers, and added the squiggles and the spider webs free hand with Stickles.


Here is a 12x12 page of raised stripes from the same Momenta pack I also sanded down.

Saturday, March 24, 2012

A Little Bit Country!

This week I got a cute new digi from Scrapbook Stamp Society - Lil Cowgirl by Sherri Baldy.


I used Momenta cardstock from PA-2390, the Black & White textured cardstock pack. I sanded it down, focusing on the raised edges, and then inked it with Wild Honey. The little girlie is colored with Copics, and wild honey added to give her the glow. I added some jute and a glittery sticker, and a circle of MME paisley paper... plus that random red trim that I got from Precocious Paper when I placed an order.

I plan to give her to Mom for her birthday I think, being all country and what have you :)

Tuesday, March 20, 2012

SYAO7

Having lots of fun as part of the Scrap Your Ass Off competition at Paper Secrets.

This week's challenge, and as a reminder I have to use 4 of the 8 elements and 1 of the 3 techniques:


Lace/Trim/Ribbon
3+buttons
3+flowers
rubons
chipboard
bling
staples
3+ patterned papers

TECHNIQUES
stitching (hand-machine or faux)
misting
distressing


I love this sketch and had lots of fun using it.


I used a ton of chipboard on this one, rick rack trim, flowers (chipboard and gem ones) and more than 3 patterned papers. My technique was distressing using Black Soot inks on the chipboard letters and the vellum, frame, and black papers.


Monday, March 5, 2012

2SF Chase Away the Winter Blues Online Crop

Over the past week, Two Scrapbook Friends have had an online crop going on in their forums. The theme was "Chasing Away the Winter Blues" and each member of the design team presented a different, summer themed challenge for us to try out.

Joann's challenge: color inspiration based on this photo (and colors specifically orange and teal)

So anyone who regularly follows me knows this is an easy one - the wedding paper I use is orange and teal! But I forced myself not to use it and this is what I came up with:


The teal cardstock is Momenta from PA-1033, and the background paper, mice and journalling card are all from the Deja Views Cat's Life pad.


I did a ton of scrapbooking this weekend, plus we worked on the renos, so Precious didn't get much Mommy time. I actually had to pin her to keep her out of the photos taken of the above LO! Luckily she was sleeping when I took the rest below! 


Carolyn's challenge: Your favourite summer activity

I had a hard time with this one... what is my favourite summer activity??? Finally I settled on going to the beach, because I had these photos lying out on my work table because I wanted to scrap them soooo bad!!

The title was stamped using Martha Stewart stamps and Memento black ink. The "Discover" card is a transparency sticker from Making Memories.

I used Momenta for the background paper and mats, all from the Travel Pyramid Paper Pack (love these!) PK-2389. The flip flop stickers are from the Endless Summer collection ST-2116. I love using the Endless Summer and the new release Vacation set together, they coordinate so well!


Jayne's challenge: Use a postcard or postage stamp

Well this one was a first for me. I didn't know I had postage stamp or postcard embellies, and it turns out I have a bunch!


I used Momenta Travel Pyramid Paper Pack PK-2389 again, and actually made this layout on the reverse side of the one above for Carolyn's challenge. The stickers and journalling tag are also from the Vacation collection (ST-4952). I think the title vellum may be DCWV but I have had it for so long that I have no idea!!


Christa's challenge: Crash your summer stash

Here is my confession - I have nothing summer themed! I have vacation and holiday and party, and even BBQ, but nothing distinctly summer. I decided 4th of July themed papers were close enough...


This layout is some of the photos from visiting the USS Missouri while we were at Pearl Harbor. There is no journalling, because I want the plaque from the ship to speak for itself. The Japanese surrender was signed on the Mighty Mo and the original document was on board.

I used white Recollections cardstock, papers from an ancient Momenta holiday/season themed pack, and stickers from a 2009 Sticker a day calendar. The alphas are new, Colorbok peel and stick stacks, and I inked them with my DIs in Festive Berries and Weathered Wood.

The sketch is the Let's Scrap 2-29-12 sketch.


Sharlene's challenge: Scrap summer outdoor attire

So I went for a wayback playback here... this is lil ol' me in 1986 on a hot afternoon lounging in my too cute polka dot swimmer. Instead of going cutesy, I decided to go with a grungy 80s look.


The papers are both from DCWV Photo Stack 3, a brand new one I just picked up last month from Zeller's. I was sooo excited to see the third installment to this huge stack because I love my Stack 2, but it is getting a little thin :)

The alphas are  Momenta ST-4490, another new release. Its a multipack of black and white alphas in different sizes and styles. I love multipacks!

Finally, the buttons are stash from a 1 lb button bag from Michael's, and the phrase under the top baby photo is from Making Memories and is a transparent sticker.


Shelby's Challenge: Let the SUNSHINE in (use a sun)

I have to admit, this one was tough. I don't have any sun embellies, I don't have any paper with suns on it... I was stuck.

Then I remembered this paper I screwed up in January - I was trying to make a sunset like color blend on it and it ended up ugly. I used a bunch of distress inks on it and didn't like how it turned out. So I cut it up and made the beautiful sun you see below!


The papers are all Recollections in black and an orange-yellow base to the blending. I used Festive Berries, Spiced Marmalade and Wild Honey inks (and maybe a touch of Antique linen) and some Perfect Pearls mist in pearl to give it a shine.

Then I tried to hand-write the title and hated it. So I used Thickers in red foam and Fancy Pants Kraft alphas in Red & Gold to cover it up... how crafty lol!


Now... you should all head over to 2SF and check out the forum for the fun weekly challenges and other special events going on!


Thursday, March 1, 2012

2SF Sketch - Baby's 1st Birthday Page

Every Wednesday over at the Two Scrapbook Friends forum, one of the DT members puts up a sketch for a challenge.

I fell in love instantly with Jayne's sketch and her interpretation of it.

The sketch screams party, circus, and fun... So, I hauled out my Momenta party papers and scrapped my first birthday!


I used Spiced Marmalade distress ink to emphasize the raised dots on the pink strip. I used my scoring board (you so need one of these to make the cupcake banner. Everything used was Momenta. 


Here is my supply list:
Pink spotted paper - PA-1033
Letters - Occaisions and Celebrations PA-1992
Cupcake Paper, Presents background paper - PA-2370

Thursday, February 23, 2012

Paper Secrets February Sketch Challenge - True Love

The Paper Secrets February sketch is by Rochelle, and is tres cute...

I thought it looked like a lot of fun, but I decided to replace the two bottom photos with one 4x6, and this is what I came up with....


I knew, with the little square to the left at the top, that this was the page to use. I had the "Its our song" vellum already set aside with this photo, of my first dance with my husband as seen by my sister.


I used a pile of stamps to make the background behind the photo, and Spiced Marmalade, Peeled Paint and Walnut Stain distress inks. I also misted the whole background. 

Now head on over to Paper Secrets and give it a try!

Friday, February 17, 2012

Paper Secrets CYAO1

OK.. so if Scrap Your Ass Off wasn't enough, I am also signed up for the Card Your Ass Off Competition over at Paper Secrets.

This week was the first round.

We had this sketch below and had to use three of the following:
Core'dinations Cardstock
Stamps
Sanding
Tearing
Inking
Flowers
Buttons


This is my card. I used a Just Rite stamp, I inked with my Distress Inks, and I sanded the card edges.


I have to say.. I'm pretty proud of how it turned out... I am starting to get this card making thing! The border punch was my Marvy again... I love my Marvy :)


Thursday, February 16, 2012

Paper Secrets SYAO2 - With this Ring

Here is the sketch and lists for Paper Secrets Scrap Your Ass off Week 2. Again, I had to use 4 of the 8 items and 1 of the 3 techniques.


ribbon/twine
3+buttons
3+flowers
rubons
3+ photo corners
3+brads
staples
border punch

TECHNIQUES
stamping
misting
distressing

Right away I knew which photo to use - I have been keeping this photo of our wedding bands and my engagement ring on my scrapping table for a while looking for the right sketch to use with it.


I used ribbon, rub ons, brads and my border punch. My technique again was misting. I really love mists lol, even though I only have 3 of them! The patterned papers, striped ribbon, chipboard and "promise" sticker are all Cosmo Cricket Everafter. 


Here's a closeup of the Everafter sticker, chipboard, two of the 5 brads used, and my Deja Views transparency sticker (love those!)


For the ribbon, I actually layered the Cosmo Cricket ribbon on top of a wide grosgain(I think) that I picked up from that ribbon section at Michaels with all the generic stuff. I pinned into the folds I wanted then stitched down the centre using the thread that was used to alter my dress (sneaky!)


This is the rub on. Its from some cheapie dollar store pack... but I really can't resist rub-ons. You can also see a bit of the inking I did. I used DIs Spiced Marmalade and Walnut Stain, with a thicker application of the SM and just edging in the WS.

Hope you enjoy... and most of all, are inspired!