Welcome to my blog!

The purpose of this blog is to explore my development of scrapbooking techniques. I will also provide reviews of products when I find something great or something terrible, and will show off all the work I enter in challenges and contests. Please check out my Welcome note if this is your first visit.

Feel free to ask questions about any of the materials or techniques shown here!

Please leave a comment and let me know what you think, or follow my blog so you can keep updated!

Happy Scrapping!


Monday, November 7, 2011

My Whole Family Scrapbooks....


Casper helping Mommy on the weekend with all the challenges we had to complete. Good thing I didn't want that bar stapler...

Sunday, November 6, 2011

Moxie Fab World Tuesday Trigger: Beads & Baubles

Well, let me tell you, when I saw the Tuesday Trigger over at Moxie Fab World this week, I was instantly inspired... it was just so... Krissy.
Krissy is my younger sister and I chose to use this inspiration photo to make a layout of photos of her from my wedding...


I feel like this layout has all the same descriptor words I would use for my sister: a la mode, fashionable, trendy, fun, funky, bright, happy, unique... etc.  I really wanted to take both the mixed-media feel and the colors from the jewelry trigger to incorporate in the layout. I chose the green/teal and white background to mimic the photo, and tried to add as much gold, pearl, bling as possible to really get the feel of the bracelet, and I think I did it!

Now for more on the details:
Paper is Cosmo Cricket. Everything else is random-ness pulled out of the stash. I used paper flowers, ribbon flowers, buttons, charms, clear stickers, Jolee's glitter stickers, bling, glass pearls, and other random stickers to keep the mixed media feel going. The metal chain is real chain I picked up in the jewelry department at Wal-Mart.


The paper roses were made from a tutorial over at Scrap A Little. You have  to check out this website, she has 20 tutorials on handmade flowers!  I brushed them with some Star Dust Stickles after the glue dried to add to the sparkles on the page.


The large ribbon rose is made using a Gluber from Cosmo Cricket.... I totally suggest you check them out and google for some tutorials on all the fabulous flowers you can make with ribbon and trims found at your local fabric store. The other small ribbon roses I received in a 1 lb bag of buttons, which is where all the gold and pearl buttons came from too!

This page ended up really thick, so I will have to use foam strips to space out the binding on my book to keep other pages from getting crushed. If you can't find a tutorial on this, there is one over in the forum at Two Scrapbook Friends.

Finally, the title and all the little clear stickers are Creative Memories Nancy O'Dell Hummingbird collection. I really love this collection as it is so elegant and fun to use. I didn't like how huge the Y was, and didn't want to use a basic serif y that was avalable, so I tucked the bottom of the y down under the page. I decided only to use her name as the title and to forgo journalling as the page was already so busy.

So I hope you enjoyed and have a good feeling for my sister and her personality now :)

HMITM Challenge #183 - Gifts

UPDATE: Thanks so much to the HMITM team for picking me as the winner this week! Good work to my fellow scrappers who also participated, I think we did a great job at using up our stashes  :)


The challenge over at HMITM this week was fab and fun! You had to include your best/greatest gifts, and also the following list of details:
Frame your page with an edge of background paper, a doodled/stitched border or a frame!
Use at least one stamp/digital brush/rub-on
3 ribbons/strings
6 circles
8 brads or buttons
10 flowers
2 elements that bleed off the page
4 crocheted or felt accents

I really love these challenges because they force you to use a lot of your stash you have lying around!

Originally I had a different plan for this LO, but when I couldn't find the photo I wanted, I looked around... and saw Casper sleeping in with all my scrapbooking stuff - his head on a stack of albums and his body on a pile of markers (crazy cat!)

And I realized, they are really a blessing in my life. They make me so incredibly happy when I come home and they missed me, and I love their little faces and attitudes they are developing. I had to put down my cat of 18 years (I had him since I was 3!) which was a very traumatic experience for me, so I shied away from having a cat. Having these kittens though is perfect. They are so much fun and keep me so happy... I think its true what they say that people with pets live longer... I certainly feel less stressed and happier with them as part of our family :)

So here they are... Casper (the friendly ghost) is the black kitten and Precious is the torti.


So back to the requirements:
Frame your page with an edge of background paper, a doodled/stitched border or a frame! - I doodled using Creative Memories templates for the top and bottom of the page with some pink Studio G glitter glue, and then did the sides free hand to "frame" the page.
Use at least one stamp/digital brush/rub-on - I used the kitten footprint stamp everywhere to add a feeling that they had been there when I made it (Casper was, but he was sleeping). I also stamped originally only on the N of Kitten, and then loved how it looked so went back in and stamped a bunch more times on the letters to make them all look walked on. I love this stamp - its of 4 feet and then has 3 other stamps on the other sides (its a cube stamp) including the little fishbone to the left of the title.
3 ribbons/strings - I used my brand new twine I just received in the mail - one to wrap the photo, one for the bow on the CM journalling card (Cheerful pack), and one to underline the title. I see twine quickly becoming my favourite!
6 circles - I may have cheated here - I am counting the 6 "bling" rhinestones in the frame as my circles.
8 brads or buttons -  There are actually 10 total brads in the LO of 3 different kinds - metallics, rhinestones, and the fabric wrapped one on the large flower.
10 flowers - 10 flowers made of various layers of almost all the paper flowers I have
2 elements that bleed off the page - The little kitten footprint stamp bleeds off the page in a few locations... see below for two examples
 

4 crocheted or felt accents - Four of the flowers have brown felt centres


Overall I loved this challenge and I love this final layout even though its kind of cute and juvenile, I think it fits as the kittens are silly babies!

Thanks for looking!

Friday, November 4, 2011

Paper Variety Smile Challenge

UPDATE: Thanks to Paper Variety for selecting me as one of the Sunday Spotlight layouts!


Paper Variety had a fun challenge this week - make something funny or humorous - any type of project you wanted...

Well I've been wanting to scrap this particular set of photos for a while, they line up perfectly like a comic strip and although you may not find it funny.... I sure do and anyone who was still sober enough at my wedding to remember this part of the night probably can't help but smile as well!

But before we get to the LO, here's some background info.

My father emigrated to Canada over 40 years ago from the Orkney Islands, a part of the UK, considered part of Scotland... but they are NOT Scottish lol. You can see it at the top of this map of the UK below, borrowed from latereviews.blogspot.com.

It is considered one of the most historically rich islands in the world, with archeological sites from all different periods, "standing stone" rings and many other wonderful historical sites. I definitely recommend a visit, and be sure to see Skara Brae, Maes Howe, the Brough of Birsay and the Ring of Brodgar. Visit Orkney is a fabulous site for tourists.

So one of the traditions (see more info on Orkneyjar) for a wedding is the Bride's Cog. It is meant for luck (and inebriation) and is passed around at the end of the night by the bride, who tries to feed everyone this alcoholic mix. I have no idea what was in it. I saw a LARGE cardboard box with all sorts of alcohols and spices in it (and of course didn't think to look closer to see what I was getting myself into). There is a recipe here, however I don't think that's the one... I remember seeing something more exotic...

So essentially this is my recipe: grab bottles of everything (including some good Scotch) and dump in large pot. Add some spices and probably some sugar. Heat her up til steaming and pour into the traditional bride's cog. You will see mine below, brought from Orkney by my darling cousin John.

So the night unfolds like this:
During the speeches, John gets up and brings wishes from the Orkney Isles, and then begins to explain the bride's cog... (scrapbook page to follow... I need to watch the wedding video and write down his exact words...). At least now everyone is prepared that a vessel of strange liquid will come to them and that they are expected to drink it...

So later on that night I get herded to the bar to pick up my cog (which I have to drink first) and its BLUE!!!  Soooo not what I was expecting... and here is the LO of that very moment!


My goal was to make it comical and comic strip like without being a strip. Papers and journalling block are all Creative Memories Reminisce. The speech/thought bubble are hand drawn and colored with my Copics (T10, B00, B05, Y15) and the title is also Copics (same with some Y13 added in as well). There is also some E0000 Copic drawn around the photos and doodled, which the camera could never pick up, but it gives the paper a tiny bit of texture and patterning.

Its a pretty simple layout, but I didn't want anything flashy to take away from the photos.

To follow this in my scrapbook will be at least 4 pages, if not more, on my guests drinking, their reactions and faces. It will be similar to this as I think most of the journalling will be in speech/thought bubbles... not sure yet as I haven't done them yet!

And to answer the question on everyone's mind... it wasn't that bad. I almost liked it hot. When it was warm, it hit my stomach and my stomach was very unhappy with that... but hot it was passable. Not nearly as scary as it looked :)

Hope you enjoy, please share your stories of Bride's cogs if you have them.. .and if not, make some Orcadian friends so you can try it out!


CR84FN Color Challenge #1

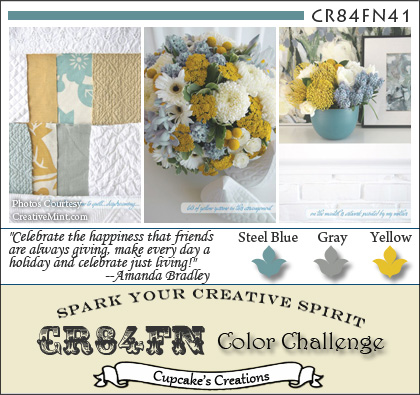
This week, I found this fab blog, CR84FN, who hosts color challenges. I love color challenges because they are a great way to expand your horizons. Most of the time, the colors are not ones you would select on your own, so its a great way to get out of the box and get those creative juices flowing.

This is the inspiration image:

I really love how they give you multiple images plus the color swatches of the colors they are into.

When I saw steel blue, I thought immediately of my DCWV "Neutrals" textured cardstock pad - it has a fabulous steel or icy blue, more like the flowers than the swatch. The yellow and gray combo brought me right back to my wedding theme papers - Cosmo Cricket's EverAfter (2009 release), as there are some beautiful yellow and gray patterns included in the package

I also thought "boys" - how stereotypical... but in flipping through the wedding photos I really liked how the colors set off the limo.. and so this page was born:


The limo embellie is Jolee's, blue flowers are Creative Memories, and large flowers are Recollections, chipboard is Momenta (I think).

Enjoy!

Wednesday, November 2, 2011

Sketchy Thursdays 10.27 Sketch Challenge

The sketch this week  over at Sketchy Thursdays was gorgeous!

I knew right away I wanted to use it to showcase a nice photo of myself and DH on our wedding day... but that was as far as I got.

I got to thinking about the song that played while I was getting ready - Freeze the Moment by Jordin Sparks... and hence the title was born.

I then had to search through the photos to find the perfect "frozen moment" to compliment the title... and this is what I came up with:


Cardstock is DCWV. Paper is Cosmo Cricket Everafter. WeR metal letters.

Tuesday, November 1, 2011

Moxie Fab World Tuesday Trigger "Autumn Woods"

When I saw this Trigger inspiration photo over at Moxie Fab World, I was immediately inspired.

First, the colors took me back to my beautiful wedding bouquet with its variations on oranges and greens, with a touch of yellow, red and brown. I also loved the squares and the dimensional aspect of it all, and was determined to combine this into a fantastic layout... and here it is!


This was a great challenge because all the paper I used came out of my scrap bin! I am a hoarder when it comes to scraps, I know there are some pieces I will never be able to use but I can't throw them away, so into a big basket they go! Luckily I had lots of coordinating reds, oranges, yellows and a bit of green and brown left over from other projects.

I used my Creative Memories square punch to punch all the squares. I then inked the edges with Distress Ink - Walnut stain. I used 1/8" adhesive foam squares to "pop" out some of the squares, adding to the dimensional feel of the layout.

I finished off with a few photos, including one I fussy-cut.


I had a lot of fun with this one, and still have to add the title. It will be made of letter charms strung on a piece of twine (somewhere in the mail on the way to my house right now) and wrapped around the photo of me with the flowers.