Welcome to my blog!

The purpose of this blog is to explore my development of scrapbooking techniques. I will also provide reviews of products when I find something great or something terrible, and will show off all the work I enter in challenges and contests. Please check out my Welcome note if this is your first visit.

Feel free to ask questions about any of the materials or techniques shown here!

Please leave a comment and let me know what you think, or follow my blog so you can keep updated!

Happy Scrapping!


Wednesday, February 29, 2012

Guess what!!

I am now on the design team for Scrapbook Stamp Society! Who knew I would get a digi stamp position when I barely even have any Copics! Had to send hubby out to get me a green one since I don't have any and I needed some green to do some flowers!

This is the card I've made for tonight's release party. Head on over to Facebook and check out all the new releases and oldie but goodies!

The little lady I am showcasing tonight is Nellie & The High Wire Act from the Cirque de la Ragamuffins collection by Sherri Baldy. It is a cute collection!


I used DCWV cardstock, stash cardstock, and some glitter glue.

For Copics, I used R32, R35, R39, R29, Y13, Y15, Y17, E31, E37, E0000, E000, E00, E02.

I think she is totally cute, and I plan on sending this likely to my baby cousin who does ballet.

You could also use her for you can do it, good luck, and happy birthday cards for sure. If you have another idea, please add it in the comments! I would love to know what you woudl use her for!

Thanks for visiting!

Thursday, February 23, 2012

Scrapbook Stamp Society / Momenta D-lite girls Hop


Welcome to our hop. Some of the Momenta D-lite girls have decided to try our hand with digi-stamps from the Scrapbook Stamp Society. We mixed some of our favorite Momenta products with a few of our favorite digi stamps. You can view all of our projects quick and easy at the http://www.facebook.com/ScrapbookStampSociety facebook page.

If you would like to hear our recipes for our projects and see them up close please click on our blog links posted on that Facebook page.

Here is the blog post on this card:
I got the opportunity this week to work with this super-cute digi-stamp from Scrapbook Stamp Society and Addicted to Stamps. Her name is Lil Ragamuffin Bunny by Sherri Baldy. I was given a few to choose from, but I loved her right-off. She was so different with her little attitude from most of the happy cutesy digis out there! I really wanted to do her justice by making a bit of a punky card with some attitude.

Get her as a freebie, here!
So here it is!


The cardstock is Momenta PA-1033. I love their textured cardstock, it adds so much to a page, and when sanded, chalked or inked, adds a lot to a card or a page.

The purple patterned paper is also Momenta from PA-1992, which I can't link up for you. Its the Occaisions and Celebrations paper pack. I just picked it up after Christmas :) It has a ton of nice papers, but nothing specifically holiday, all more generic. Its the perfect starter kit as it gives you papers to use for every occaision and every need.

I colored our Lil Ragamuffin Bunny with my Copics. Her fur was BV00, BV02, BV04. Her tummy and feet in BG10 and BG15. Her tail is YR0000, YR00. Her face is YR0000, E00, R20. Lips R32, eyelids BG15, and eyes B02. Her hair was Y11 and E31.  I really don't have many more Copics than that, but that was all I needed to make her so cute!

Hope you like her and hop on over to get her to get all your Easter cards ready!!

Paper Secrets February Sketch Challenge - True Love

The Paper Secrets February sketch is by Rochelle, and is tres cute...

I thought it looked like a lot of fun, but I decided to replace the two bottom photos with one 4x6, and this is what I came up with....


I knew, with the little square to the left at the top, that this was the page to use. I had the "Its our song" vellum already set aside with this photo, of my first dance with my husband as seen by my sister.


I used a pile of stamps to make the background behind the photo, and Spiced Marmalade, Peeled Paint and Walnut Stain distress inks. I also misted the whole background. 

Now head on over to Paper Secrets and give it a try!

Wednesday, February 22, 2012

Paper Secrets SYAO3 - Snooze in the Sun on a Snowy Day

I am having a lot of fun with Scrap Your Ass Off 2 over at Paper Secrets.

Here is week 3's challenge:


ribbon/twine
3+buttons
3+flowers
rubons
3+ photo corners
bling
staples
border punch

TECHNIQUES
stitching
misting
distressing


As usual, use 4 of 8 items and 1 of 3 techniques. This is what I came up with. There truly was no thought process going on, just digging through photos to find one that worked.


The photos suck, but Casper was just so cute sleeping in the window one day. Of course she woke up and had to pose for me even cuter (what a ham) when she realized I had the camera out.

What I used:  3 buttons, twine, rubons, bling, and stitching (behind the photos, kinda tough to see!)

The cardstock is Momenta from PA-1033 (love it!). This stripey one is one of my favs. The photo paper is from DCWV Photo Stack 3! I just got it at Zellers! And I love it as much as my photo stack 2! (If anyone out there has 1 that they don't love... I will pay for shipping, and send you some crap I don't like or some $$$)

I think the rubons are Basic Grey. But I will have to check on that!  (Note: just checked my invoice for them in my email. Basic Grey Max Whiskers Black)

The fish dream bubble and heart collar tag is Momenta from ST-2944, the Shimmer and Shine Cat stickers (love them so much I have two packs!)

And the snowflakes, snowflake buttons, and twine are random. Actually, twine is 90% certain American Crafts..


Here are the flower rub ons. its hard to see the blue blings, but those came with the rub on sheet, pre-stickied and everything! Very cool!


Here's my crazy title... I didn't have small black letters I liked to use with the red letters, and didn't have enough red letters to make the title (it was all the o's).... This is a good way to emphasize the important words in a long title so it doesn't seem so overpowering. You can also see my teeny weeny snowflake button. I love that button lol... I've been waiting for the right spot to put it for so long. Now I want more (again... mail for trade or $$)

Anywho... thats enough chatting today! Happy Wednesday!


Sunday, February 19, 2012

CYAO2 - New Home Card

This week's challenge over at Paper Secrets:


Use 3 of the following products/techniques:
Patterned Paper
Mist
3 or more layers
chipboard
Dry embossing
twine


This is my card. I am not really setting out planning to make cards for any specific occaision, and am just sort of going where I feel like it. I am also trying to use papers from my scrap bin only.


This card started with the patterned paper which I decided I wanted to use... and went from there!

Hope you like it!


Friday, February 17, 2012

Paper Secrets CYAO1

OK.. so if Scrap Your Ass Off wasn't enough, I am also signed up for the Card Your Ass Off Competition over at Paper Secrets.

This week was the first round.

We had this sketch below and had to use three of the following:
Core'dinations Cardstock
Stamps
Sanding
Tearing
Inking
Flowers
Buttons


This is my card. I used a Just Rite stamp, I inked with my Distress Inks, and I sanded the card edges.


I have to say.. I'm pretty proud of how it turned out... I am starting to get this card making thing! The border punch was my Marvy again... I love my Marvy :)


Thursday, February 16, 2012

Paper Secrets SYAO2 - With this Ring

Here is the sketch and lists for Paper Secrets Scrap Your Ass off Week 2. Again, I had to use 4 of the 8 items and 1 of the 3 techniques.


ribbon/twine
3+buttons
3+flowers
rubons
3+ photo corners
3+brads
staples
border punch

TECHNIQUES
stamping
misting
distressing

Right away I knew which photo to use - I have been keeping this photo of our wedding bands and my engagement ring on my scrapping table for a while looking for the right sketch to use with it.


I used ribbon, rub ons, brads and my border punch. My technique again was misting. I really love mists lol, even though I only have 3 of them! The patterned papers, striped ribbon, chipboard and "promise" sticker are all Cosmo Cricket Everafter. 


Here's a closeup of the Everafter sticker, chipboard, two of the 5 brads used, and my Deja Views transparency sticker (love those!)


For the ribbon, I actually layered the Cosmo Cricket ribbon on top of a wide grosgain(I think) that I picked up from that ribbon section at Michaels with all the generic stuff. I pinned into the folds I wanted then stitched down the centre using the thread that was used to alter my dress (sneaky!)


This is the rub on. Its from some cheapie dollar store pack... but I really can't resist rub-ons. You can also see a bit of the inking I did. I used DIs Spiced Marmalade and Walnut Stain, with a thicker application of the SM and just edging in the WS.

Hope you enjoy... and most of all, are inspired!

Let's Scrap 1-11-12 The Groom

Unfortunately with all the travelling I did last month, I missed submitting this challenge on time to Let's Scrap based on the 1-11-12 sketch below.

1-11-12

I really didn't have enough vertical photos to make it work out, so I rotated the right page to allow for the use of some horizontals too.


I made my husband write the journalling card for this one... he stressed over it for days (another reason I missed the deadline) but it came out cute... with his little dig about being early. I ran behind all day because of a screw-up on my fake nails :)


Tuesday, February 14, 2012

Momenta D-Lite Annoucement

Well... guess what?

I made the Momenta D-Lite design team... its like a "lite" version of a design team with less requirements but still lots of perks!

We got to choose the products we wanted, and what a time I had! There were soo many gorgeous products!

I really fell in love with the Chloe's Garden line. Everything else I picked was functional (a party pack because I've been complaining I have no party paper, a beachy stack because I ran out of beach stuff, cat themed stuff.. etc)... but this one was purely because I loved it!

Below is 
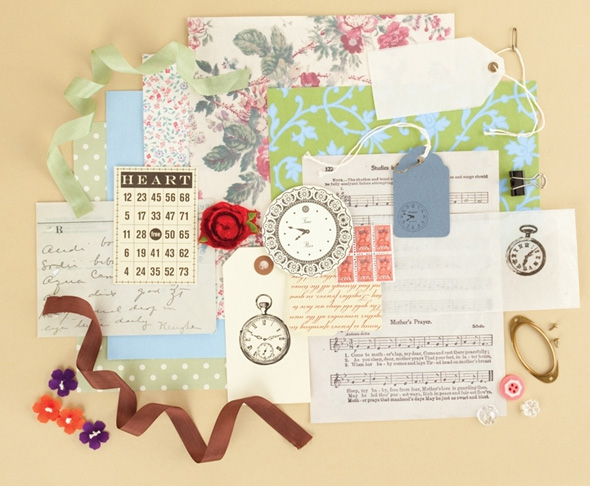
PA-2384, the Chloe's Garden pyramid paper pad. Love it! First of all, these pyramid pads are so cool because you get a few pages in smaller sizes, so you don't have to cut up a 12x12 for a small piece. Plus, the patterns are shrunk on the smaller papers, so you do have more useable papers for card making and you have a diversity of patterns.
12X12 CHLOES GARDEN PYRAMID PAPER PAD

I really didn't know how I was going to use these, but they turned out to be the first Momenta products I turned to. I used this sketch from a Two Scrapbook Friends sketch challenge.

I think the dragonfly is what sent me in the direction of Chloe's Garden. I also wanted to use these photos of my cousin and her family, and rather than doing the same old orange, I wanted something different. So here it is!


In addition to the pyramid pack, I also used the Chloe's Garden Borders ST-5159. They're not on the website yet, so I can't link them up for you, but you get 4 puffy 12" border strips. These are too cute... they are puffy sticker borders. I cut two of the 12" borders up for this. First the flower one to have two pieces of it, and then just a small portion of the banners was used... I finally found banners I love! Amazing!!

The title is also in Momenta puffy alphas ST-3190. I really like these as well. First, there's a good combo of letters. Second, they are just cute!

I also used Peeled Paint Distress ink on the edges of the dot paper and the base cardstock. The Peeled Paint and the Weathered Wood go great with this collection. I don't have any pink distress ink yet, so I can't tell you which one to use, but I think its the one in the basic set that's available every year. I used my Marvy Uchida border punch, and a blue gel pen too.

Hope you enjoyed, and if you're not familiar with Momenta, check them out! For all my Canadian friends, I buy most of my Momenta at Zellers. Everything is a good price there and they have a good selection... just look for the logo...

atd


Happy scrapping!!


Practical Scrappers 2nd Round Entry

Well, sadly I didn't make it through to the second round over at the Practical Scrappers layout contest, but I did make the 2nd round layout anyways. We were given a choice of two sketches. I can't seem to find the one I used on their website... but here is the layout anyways...


I used Spiced Marmalade distress ink with a bit of Antique Linen and my non stick craft mat to make the background coloring. I then machine stitcled the flowers, and colored them in with my Copics.

Tuesday, February 7, 2012

Paper Secrets Scrap Your Ass Off 2 - Round 1

I have joined this crazy competition over at Paper Secrets! Its last-woman-standing style, and each week we get a different challenge that we have to complete in a week. If you miss a week.... you're out!

So here we go with week 1...

Complete a layout based on the following sketch provided by PageMaps. You must also use 4 of the 8 products listed and 1 of the TECHNIQUES You have 7 days to complete your layout & upload it to our gallery to move on to the next challenge.
Be sure to upload your layout to your personal album & use the keyword "SYAO1"
Your layout MUST be posted in the Gallery album by 11:59 PST on 2/7 to go on to the next round
ribbon/twine
3+buttons
3+flowers
rubons
3+ photo corners
3+brads
staples
altered or raw chipboard/cardboard

TECHNIQUES
stamping
misting
dry or heat embossing


OK - I have to confess, I love this sketch but had a really hard time finding a use for it and ended up not doing one when PageMaps released it the first time around... but I couldn't drop out first round so I had to get it figured out this time... and I am glad I did. It was a lot of fun!


I ended up following the sketch fairly closely. I really liked the "clothesline" look, so that was what I wanted to stay with. These photos are of me and mom in 1990, skating on an area that used to fill with water and ice over every year next to the house. Stickers are Momenta.

The four elements I used were:
3 brads
4 buttons
altered chipboard letters
twine

The techique I used was misting. Its hard to tell unless you know what that Fancy Pants paper looked like beforehand - I used Perfect Pearls so its a little shinier and there are white dots all over as "snow", but I misted very lightly so the background paper would still shine on through :)


 Here is my altered chipboard title. Those letters are "blue foil" so I sprayed them with more Perfect Pearls mist and then used a heat gun to make it set, giving them the white spotty "snowy" look.


 This element is from Precocious Paper. I really like her elements; you will see me using a lot more as I got a huge package full right after Christmas!


This is my brown American Crafts twine with a Recollections brad. I used my glue pen (the blue stuff) to draw out where I wanted the twine to go then stuck it in really fast before the glue switched to repositionable. It is a really easy way I just discovered to do fancy things with twine.

Thanks for visiting!! I am travelling like crazy for work right now so hopefully I will get more time to scrap! 

Wednesday, February 1, 2012

Let's Scrap Blog Hop

Hello and welcome to your next stop in the


If you came here from Eniko's blog then you are in the right place! If you did not, Mindi Brown has the hop order to help you find your way.


I am so excited to be involved in this hop! Its my first hop, and I can't wait for all the fun! Let's Scrap is a great website with double layout sketches, card sketches, fun challenges, tutorials, and lots lots more! There are groups of gals getting together to get inspired, get busy, and get some scrapping done!! Head on over and check it out!!


Here is the sketch I am showcasing for the hop:


Here is my snazzy little card...


Caspie really wanted to be involved in the blog hop too! She's really feeling lovey dovey lately, and loved my card... I think she might want to give it to Precious?


I changed the square to a smaller circle for a few reasons. One, I wasn't feeling the square. Two, circles are representative of happiness, family, togetherness... this is why you love them so much on layouts. I thought for a Valentine's Day card a circle would be more appropriate. Three, my patterened paper looked cuter in a circle.


True to the sketch, I used a pile of bling to make the heart. I also added Stardust Stickles to the centre X and O on the pp to enhance it, and some pink glitter glue to the hearts inside the "o"s on love you.


All my supplies are random stash stuff - nothing from any big manufacturers!


Now for the fun part! Here is the RAK I am offering! It is the "home" 8x8 Vintage Findings kit from Making Memories! I stole the photo off the Making Memories website, rather than opening the package and having to get it all back in!

Here is how easy it is to enter for my random draw


*Be or become a member of Let’s Scrap which you can do by clicking here http://letsscrap.ning.com/ . It is free, easy and fast! Once you get there, I am sure you will love it!


*Become a follower of my blog


*Leave me a comment telling me who your valentine is this year!! My valentine is always my baby sister since its her birthday (xxx)


And if you would like a second chance in the draw


*Make a card from the sketch I have posted and upload it to the gallery at Let’s Scrap. Please tag it as such   2-2-12,LEAP47


Please note there are no spaces and that LEAP is all capitals. 


*Leave a comment with a link to your card on Let’s Scrap.


The hop ends at 11:59 pm Central Standard time February 29th, which you would be able to track using the clock on the main page of Let’s Scrap.

Can't wait to see what you all come up with!


Thanks for visiting,  and joining in on this fun hop! Good luck, and keep hopping!!

Your next stop will be the talented Moira Coward.


If you get lost along the way or have joined the hop in the middle, Mindi Brown is the beginning of the hop. You don’t want to miss any of the fun!